Trigger Finger: Symptoms, Causes, and Treatment Options
Trigger finger, also called stenosing tenosynovitis, happens when a finger or thumb catches, clicks, or locks as you try to bend or straighten it. We explain why it occurs, the most common symptoms, how doctors diagnose it, and the treatment options that help you get back to comfortable hand use.
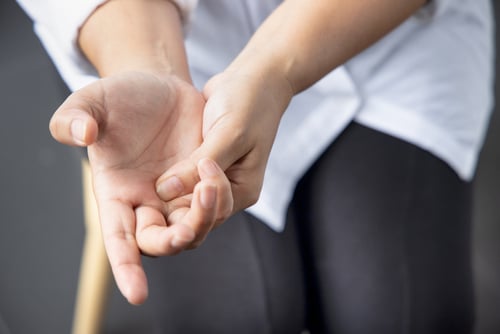
If you feel a pop in your palm or need to use your other hand to straighten a finger, you are not alone. This condition is common, often treatable without surgery, and very responsive to early care.
What Is Trigger Finger?
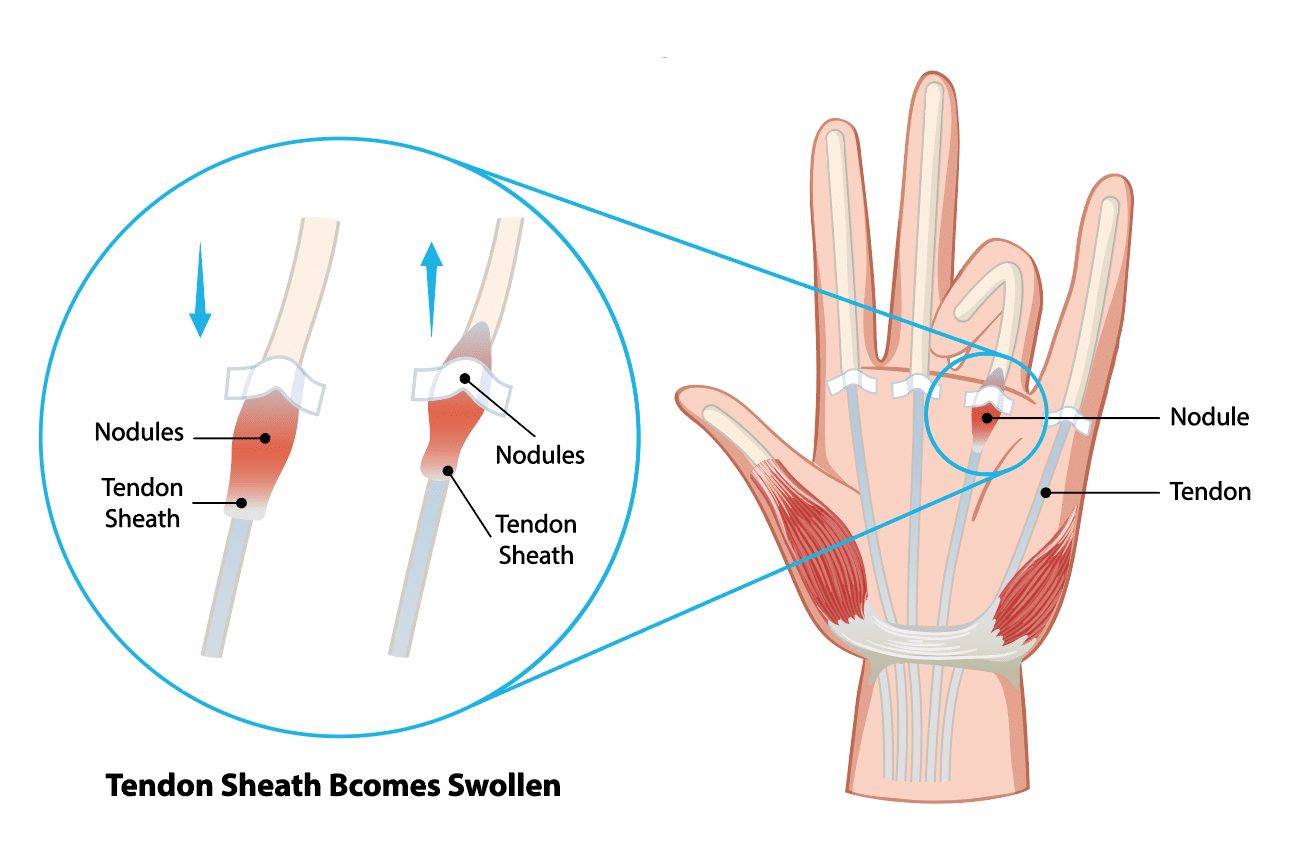
Your flexor tendons glide through tunnels in the palm called pulleys. With trigger finger, the tendon lining and the A1 pulley at the base of the affected finger or thumb become irritated and thickened. That narrowing makes the tendon catch as it moves, which creates clicking or locking.
Medical term: stenosing tenosynovitis, which means a tight tendon tunnel that limits smooth motion.
Most often involves the ring finger, middle finger, or thumb, but any digit can be affected.
The problem sits at the palm-side base of the finger where the tendon first enters the sheath.
Common Signs and Symptoms
Most people notice symptoms gradually, developing over days or weeks rather than all at once. At first, you may feel stiffness when you wake up, which improves as you use your hand. You might also notice a dull ache at the base of the finger near the palm, and a tendency for the finger to catch or click as you move it.
Clicking, catching, or popping when bending or straightening the finger or thumb
Pain or tenderness at the base of the finger on the palm side
Stiffness, especially in the morning
A small, tender bump in the palm that moves with the finger
Locking in a bent position that may suddenly release or require the other hand to straighten
Why Does Trigger Finger Happen?
Several factors can irritate or swell the tendon and its sheath, which tightens the space the tendon needs to glide.
Repetitive gripping or tool use that stresses the palm
Inflammatory conditions, such as rheumatoid arthritis
Diabetes, which can affect tendon health and healing
Coexisting hand issues like carpal tunnel syndrome or De Quervain’s tendinopathy
A prior hand injury or local swelling around the tendon sheath
How Trigger Finger Is Diagnosed
Diagnosis relies on what you tell the clinician and a careful examination of the hand. The doctor checks for tenderness over the A1 pulley, watches how the finger moves, and may feel a small lump along the tendon. Imaging tests are not usually needed unless the exam is unclear.
Tenderness over the A1 pulley at the base of the affected digit
Clicking, catching, or locking is observed with active motion
A small, moving nodule in the tendon may be felt
Ultrasound can be used in select cases to assess the tendon sheath
Doctors differentiate trigger finger from conditions like Dupuytren’s contracture, which pulls the finger down but does not cause tendon catching
Nonsurgical Treatment Options
Many people improve without surgery, especially when care starts early. The goals are to calm irritation, help the tendon glide smoothly, and reduce stress on the pulley. You may change how you use your hand, rest the affected finger with a removable splint, and work with a therapist. In some cases, a corticosteroid injection helps reduce swelling and catching.
Activity changes: limit prolonged gripping, take breaks, and use tools with larger, cushioned handles
Splinting: a removable splint, often worn at night, can rest the tendon and reduce morning stiffness
Anti-inflammatory strategies: ice and over-the-counter medications as directed by your clinician
Hand therapy: guided stretching, gentle tendon gliding, and education on joint protection
Corticosteroid injection: a targeted injection into the tendon sheath can reduce swelling and catching. Possible side effects include temporary soreness, skin lightening or thinning near the site, and a short-term rise in blood sugar in people with diabetes.
Helpful Daily Habits
Switch tasks or hands to limit repeated gripping
Use pens, kitchen tools, and garden tools with wider handles
Warm up the hand with a gentle motion before heavier use
Practice tendon-gliding exercises from your care team
What To Avoid For Now
Forceful or prolonged squeezing, like heavy pruning or weight handles without padding
Repeating the same grip task without breaks
Sleeping with the finger curled tightly
Pushing through painful locking episodes
Surgical Treatment When Needed
If symptoms persist, the finger locks frequently, or injections and splinting do not help, surgery can be a good option. The procedure is called an A1 pulley release. The surgeon widens the tight opening at the base of the finger so the tendon can glide smoothly again.
Typically performed with local anesthesia as an outpatient
Open or percutaneous techniques are used based on your anatomy and the surgeon's preference
Finger motion usually begins the same day to limit stiffness
Expected recovery includes temporary tenderness in the palm and progressive return to daily tasks
Risks include infection, stiffness, scar tenderness, and nerve irritation, which are uncommon
Choosing a Treatment Path
Your care plan is tailored to how your hand feels, your medical history, and what you want to return to doing. The plan explains options from less invasive treatments to surgery and describes what to expect at different stages. You and your clinician work together to choose the best path for you.
Situation
First Steps
If Symptoms Persist
Mild clicking and morning stiffness
Activity changes, splinting, ice, hand therapy
Consider corticosteroid injection
Frequent triggering that interferes with work or self-care
Corticosteroid injection and targeted therapy
Discuss surgical release
Locked finger or long-standing symptoms
Prompt evaluation by a hand specialist
Surgical release is often recommended
Recovery and Returning to Activity
After treatment, moving the hand in a steady, gentle way helps the tendon glide smoothly and reduces stiffness. Whether you had nonsurgical care or surgery, follow the recommended exercises and gradually return to daily tasks. Protect the palm from heavy pressure until it feels comfortable and strong again.
Follow your home exercise program and protect the palm from heavy pressure until it is comfortable
Ease back into gripping tasks with larger-handled tools and frequent rest breaks
Let your care team know if locking returns or if stiffness limits progress
When To See a Hand Specialist
Schedule an evaluation if any of the following apply:
Triggering lasts more than a few weeks or is getting worse
You need your other hand to unlock the finger
Pain or stiffness interferes with work, sports, or daily tasks
You have diabetes or rheumatoid arthritis, and the symptoms are persistent
Care at Princeton Orthopaedic Associates
Princeton Orthopaedic Associates treats trigger finger with careful evaluation and a plan that fits your goals. The team offers nonoperative options first and uses precise surgical release when needed. If your finger catches, clicks, or locks, you can regain comfortable hand use. Call to schedule an appointment to begin.
This blog post is meant to be informative and should not act as a self-diagnosis tool. If you’d like to see one of our doctors, please contact us here.
Shoulder Labrum Tears: Symptoms, Diagnosis, and Treatment Options
Shoulder labrum tears can cause deep shoulder pain, clicking, or a sense that the joint might slip. You'll learn what the labrum does, how tears happen, the most common symptoms, how we diagnose the problem, and which treatments can help you return to daily activities and sports safely. By understanding what causes labrum tears and the steps involved in evaluation and treatment, you can ask informed questions, set realistic goals, and participate actively in recovery with your care team.
What Is the Shoulder Labrum?
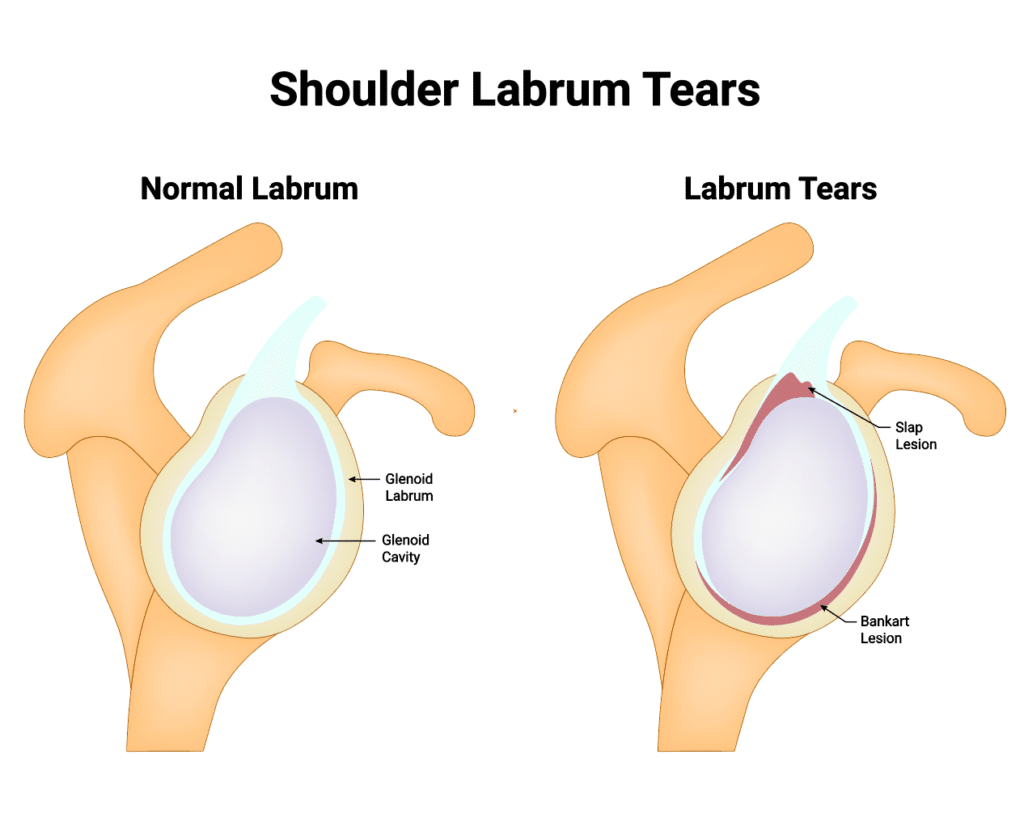
The shoulder labrum is a rim of cartilage that lines the shallow socket of the shoulder joint, called the glenoid. It deepens the socket, cushions the joint, and helps your ligaments and biceps tendon keep the ball of the shoulder centered.
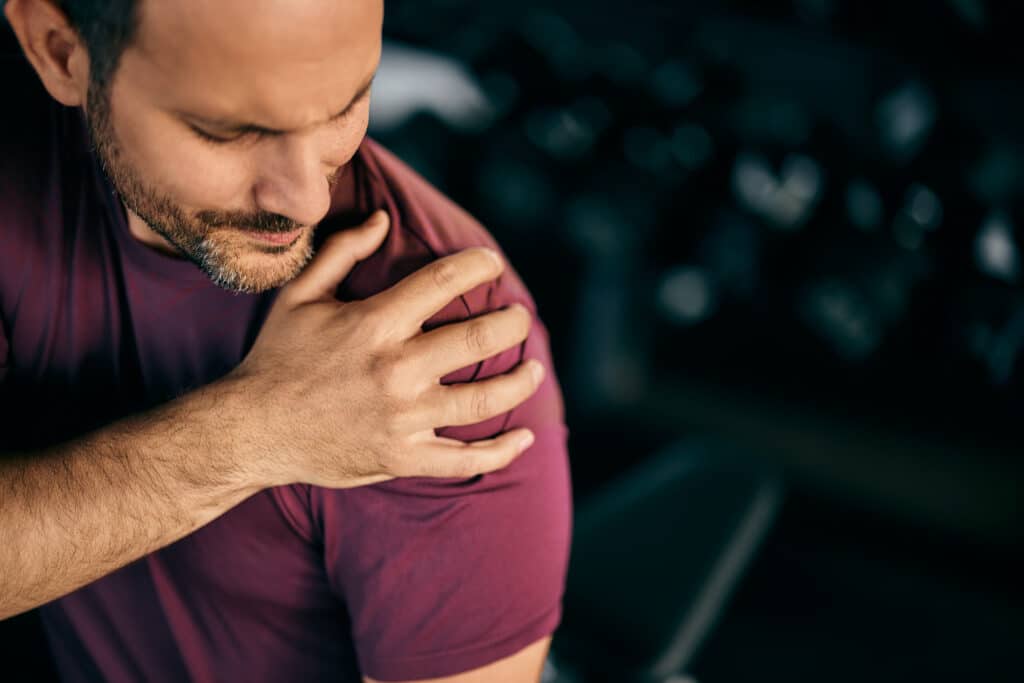
When the labrum tears, the joint can feel painful or unstable. Some people notice catching, clicking, or a drop in strength when lifting, pushing, or reaching overhead.
Common Types of Labrum Tears
Several patterns of tearing can occur depending on where the labrum is injured and how the injury happened.
Type
Location
Typical Cause
Common Symptoms
Typical Treatment Approach
SLAP Tear (Superior Labrum Anterior to Posterior)
Top of the socket where the biceps tendon attaches
Overhead sports, falls on an outstretched arm, wear-and-tear
Pain with overhead use, clicking, reduced throwing power
Physical therapy, activity modification; arthroscopic repair or biceps procedures when needed
Bankart Tear
Front-lower portion of the labrum
Shoulder dislocation or subluxation
Instability, repeated dislocations, apprehension with abduction/external rotation
Rehab to restore control; arthroscopic Bankart repair for recurrent instability
Posterior Labral Tear
Back portion of the labrum
Forceful pushing, blocking, falls, repetitive loading
Deep posterior pain, clicking, pain with pushing or bench press
Rehab focused on scapular/rotator cuff control; arthroscopic repair if instability persists
Symptoms You Might Notice
Symptoms can vary depending on the type of labrum tear and your level of activity, but several signs are common across many cases. People may notice deep shoulder pain during lifting or overhead work, a sensation of catching or grinding within the joint, and reduced strength when pushing or throwing. Some experience night pain or reduced range of motion compared with the other shoulder. These patterns help guide evaluation and treatment choices.
Deep, hard-to-point-to shoulder pain, often with overhead use
Sensation of catching, grinding, or clicking inside the joint
Weakness when lifting, pushing, or throwing
Feeling that the shoulder could slip out or is less stable than usual
Pain at night or when lying on the affected side
Decreased range of motion compared with your other shoulder
Common Types of Labrum Tears
How Labrum Tears Happen
Trauma, such as a fall on an outstretched hand or a direct blow
Shoulder dislocation or partial dislocation
Repetitive overhead motion in activities like baseball, tennis, swimming, or weightlifting
Gradual wear related to age and everyday use
Shoulder laxity or poor shoulder blade and rotator cuff control
When to See a Shoulder Specialist
Pain or instability that lasts more than a few days after an injury
Recurring popping, catching, or a sense of slipping in the joint
Weakness that limits work, exercise, or sport
Night pain that interrupts sleep
How We Diagnose a Labrum Tear
Diagnosis starts with a detailed history and a hands-on exam that includes specific tests to stress different parts of the labrum and shoulder. We assess shoulder blade position, rotator cuff strength, and signs of instability.
Imaging often includes X-rays to evaluate the bones and joint alignment. An MRI, sometimes with a small amount of contrast dye in the joint, can help show the labrum and associated soft-tissue injuries.
Nonsurgical Treatment
Many labrum tears improve without surgery, especially when pain is the main issue and the shoulder is stable.
Activity modification to reduce painful overhead or heavy pushing motions
Pain and inflammation control with ice and medications as advised
Targeted physical therapy to restore shoulder blade control and rotator cuff balance
Gradual strengthening and return-to-sport progression guided by symptoms
In some cases, a guided corticosteroid injection may help with pain to allow better participation in therapy
Surgical Options
If pain or instability persists despite focused rehab, arthroscopic surgery may be recommended. Through small incisions, your surgeon can evaluate the labrum and repair or trim damaged tissue as appropriate.
Bankart repair to restore stability when the front of the labrum is torn with a dislocation
SLAP repair or procedures involving the biceps tendon, chosen based on age, activity, and tear pattern
Posterior labral repair for recurrent symptoms at the back of the joint
Recovery Timeline and Return to Activity
Recovery depends on the type of tear, the procedure performed, and your sport or job demands. The general ranges below are common starting points that your surgeon and therapist will personalize.
Phase
Typical Timeframe
Focus
Sling/Protection
2-4 weeks after debridement; 4-6 weeks after repair
Protect healing tissue, gentle hand/elbow motion, pain control
Early Motion
Weeks 2-8 after debridement; Weeks 4-10 after repair
Restore range of motion under guidance, avoid provocative positions
Strength & Control
Months 2-4
Scapular and rotator cuff strength, posture, gradual load
Return to Sports/Work
3-4 months for non-contact after debridement; 4-6+ months after repair
Progressive sport-specific drills; throwing programs may take longer
Protecting Your Shoulder Going Forward
Keep the shoulder blade stable during overhead work and lifting
Build balanced strength in the rotator cuff and core
Ease into new training volumes and avoid sudden spikes
Use proper technique for throwing, pressing, and pull-ups
Stop and seek guidance if you feel joint slipping, catching, or sharp pain
Get the Right Diagnosis and a Clear Plan
If shoulder pain, clicking, or instability is limiting you, we’ll examine your shoulder, review imaging when needed, and create a plan that fits your goals. Most people start with focused rehab, and when surgery is the best path, your team will guide you each step of the way.
Schedule an evaluation with Princeton Orthopaedic Associates to get moving comfortably again.
This blog post is meant to be informative and should not act as a self-diagnosis tool. If you’d like to see one of our doctors, please contact us here.
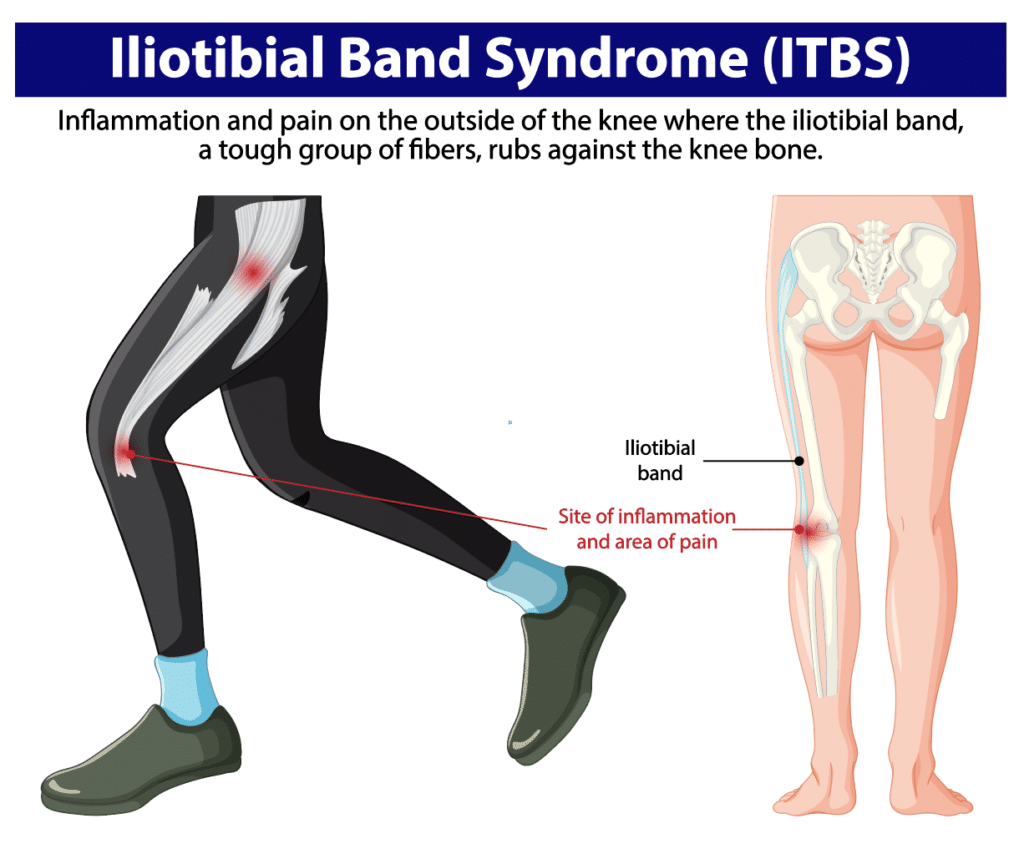
Iliotibial Band Syndrome: Outer Knee Pain You Can Treat
Iliotibial band syndrome, or more commonly called the IT Band, is a common source of aching on the outside of the knee or thigh. Below, you’ll learn what the iliotibial band is, why it gets irritated, how symptoms show up in daily life and sport, and the treatments that help you return to comfortable movement.
Whether you run, cycle, walk for exercise, or spend long hours sitting, this condition can affect how your hip and knee work together. The good news is that most people improve with a plan that reduces irritation and restores strength and mobility around the hip and knee.
Quick Facts
The iliotibial band, or IT band, is a strong band of connective tissue that runs from the outer hip to just below the knee.
Irritation develops where the band moves over the outer knee, often from repetitive bending and straightening of the leg.
People notice pain during runs, walks, stair use, or after sitting for a long time.
Weak or tight hip and thigh muscles, training errors, and unsupportive footwear commonly contribute.
Most cases improve without surgery through changes in activity, targeted strengthening, stretching, and physical therapy.
What Is the IT Band and IT Band Syndrome?
The IT band is a thick, fibrous band that supports the outside of your thigh. It connects muscles near the hip to the shinbone and helps stabilize the knee during walking, running, and standing.
Symptoms arise when tissues deep to the IT band (such as a fat pad or bursa) are compressed against the lateral femoral epicondyle during repetitive knee flexion and extension. This compression leads to irritation and pain on the outer knee, and may be felt higher up the thigh or into the hip.
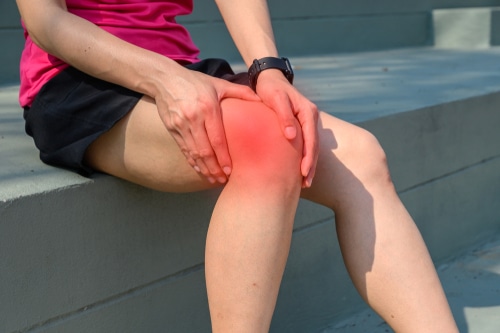
Common Symptoms
Symptoms often begin gradually and worsen with repetitive flexion and extension of the knee, such as during running, cycling, or climbing stairs. People commonly describe a mix of pain on the outer knee, tightness along the outside of the thigh, tenderness when the outer knee is touched, and discomfort that changes with movement. The pain can flare with activity but may ease with rest, and occasional stiffness after sitting is not required for the diagnosis.
Symptoms often begin gradually and tend to worsen with repetitive activities. People describe:
Aching, burning, or sharp pain on the outer side of the knee
Tightness or pulling along the outside of the thigh
Discomfort with running, prolonged walking, or going down stairs
Tenderness when pressing on the outer knee
Occasional stiffness after sitting that may ease with gentle movement (more common in other knee conditions)
If you notice snapping at the outer hip, this may reflect a related but different condition (external snapping hip/greater trochanteric pain), not classic IT band syndrome at the knee
Why It Happens
IT band irritation usually stems from how the leg moves and how much load it is asked to handle. Multiple factors can combine to create friction near the outer knee.
Everyday Contributors
Long periods of sitting that tighten the hips and thighs
Weak gluteal and hip stabilizer muscles
Standing or walking with the weight shifted to one side
Footwear that matches your needs may help some people; orthotics can be considered when alignment or support is an issue after a professional assessment
Repetitive daily movement without strength or mobility balance
Athletic Contributors
Rapid increases in running or cycling volume or intensity
Downhill running or training on banked or sloped surfaces
Stride mechanics that stress the outer knee
Weakness in hip abductors and core stabilizers
Insufficient recovery between high-load sessions
How IT Band Syndrome Is Diagnosed
A sports medicine or orthopaedic clinician typically diagnoses IT band syndrome through your history and a focused exam. They’ll check tender areas along the outer knee and hip, assess hip and core strength, and look for tightness in surrounding muscles.
Imaging is not always needed. X-rays or an MRI may be ordered when symptoms are atypical, severe, or to rule out other causes of outer knee pain such as arthritis, meniscus problems, or stress injuries.
Treatment That Works
Most people recover with a stepwise approach that calms irritation and corrects the movement issues that caused it.
Reduce Pain and Calm Irritation
Modify or pause aggravating activities such as hills, speed work, or long runs and walks
Apply ice to the outer knee or thigh for 15 to 20 minutes as needed
Use anti-inflammatory medication if recommended by your doctor
Consider a brief period of cross-training that avoids repetitive knee bending
Improve Mobility in Tight Areas
Gentle stretching for the hips, hip flexors, quadriceps, hamstrings, and the tensor fasciae latae near the outer hip
Directly stretching the IT band itself is limited by its dense structure; focus on the surrounding muscles
Soft tissue work or foam rolling for the glutes and thigh muscles to reduce tension
Avoid high-pressure foam rolling directly over the outer knee in the early painful phase; instead, target the hips, glutes, and thigh muscles
Gradual return to the full range of motion without provoking pain
Strengthen and Retrain Movement
Targeted strengthening for gluteus medius and other hip stabilizers
Core and pelvic control exercises to support proper knee alignment
Gait or running form adjustments with guidance from a clinician or physical therapist
Footwear review, and orthotics when alignment or support is an issue after a professional assessment
For persistent pain, a clinician may consider a carefully selected corticosteroid injection in the area of irritation (often image-guided). Injections should be used judiciously as part of a broader rehab plan. Surgery is rarely needed and is considered only when symptoms fail to improve after a thorough course of nonoperative care.
Recovery Timeline
Healing time varies based on how long symptoms have been present, training demands, and how consistently you follow your plan. These general ranges are common:
Stage
Typical Timeframe
What to Expect
Early
Several weeks
Pain reduces with activity changes, icing, and basic mobility work.
Established
1 to 3 months
Strength and movement retraining restore tolerance for daily life and sport.
Recurrent or Chronic
Longer than 3 months
More comprehensive rehab and training plan adjustments are needed.
Prevention Tips
Prevention means keeping movement balanced and building strength around the hip and knee. A simple plan can help avoid flare-ups: gradually increase activity, vary routes, stretch key muscles, and choose footwear that fits your needs. Regular rest breaks and listening to your body are important to prevent irritation from returning.
Increase running or cycling volume gradually, especially after time off
Vary routes to avoid repeated downhill or sloped surfaces
Maintain hip and core strengthening year-round
Replace worn shoes and use footwear that matches your needs
Take movement breaks during long periods of sitting
When to See a Specialist
Schedule an evaluation if pain lasts more than a week, returns when you resume activity, or changes how you walk or run. Early guidance helps you recover faster and reduces the risk of the problem becoming chronic.
Guides a graded return to activity and long-term prevention
Get Back to Comfortable Movement
IT band syndrome can interrupt training and make everyday tasks frustrating, but it is highly treatable. With the right mix of activity changes, targeted strengthening, mobility work, and expert guidance, you can ease pain and return to the activities you enjoy.